BeautiDuwanger
Goth
Ever wanted to create a new item with smooth physics just like some clothes that are already in game but you thought it was impossible? ... Well is not! there just wasnt detailed step by step info regarding this topic.
Just for the record, IMO this is an "advanced" level, considering it requires previous modding exp, some knowledge in maya´s UI and how game models and skeletons work.
Tools Needed:
-Minimauls tools
-Any Hex Editor
- Old 3ds MAX (2010-2013)
-Mesh importer for 3ds max
-Quantum´s List of customize textures
-MS Excel (Or similar)
-SDK Item Template
-ngSkinTools plugin for maya (This one is optional, but i really recommend it if you want nice and smooth results.
Info:
REGARDING THE GAME PHYSICS
CLONED ITEM TO REPLACE
Compared to a normal workshop mod, this task requires an specific clone. One must copy an item that has physics in game, this way its .asm_pc will be listing the .sim_pc and .rig_pc files, if you dont, the physics wont work no matter what you do.
Made tests with different items and some gave me bugs or crashes, thats why I suggest cloning TOWEL CROWN, Ive been using it without problems so far.
NOTE: For some reason the cloning tool crashes when you try to clone a suit with physics. TOWEL CROWN is a head gear, but dont worry, change the item slot labeled in the xbtl to the one desired for your mod.
STEP1: PLANNING AHEAD
You should have in mind what type of mod you wanna create. For this tutorial I will be making a new headgear to simulate a hair, so I launch my game and search for an item thats similar to what I want to achieve:
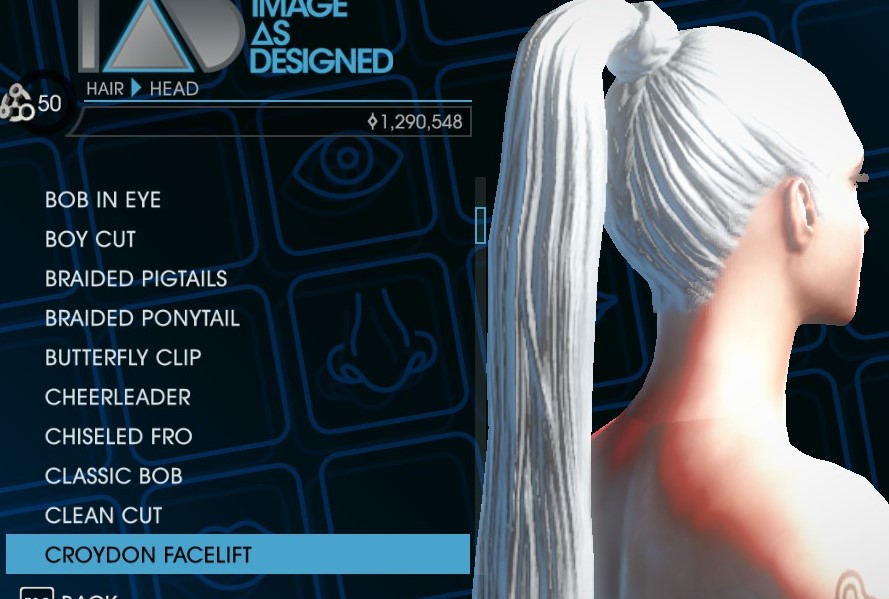
After copying the name, open Quantum´s excel file, it contains a list of all the customizable items available , showing its name, and the str2_pc containing it.
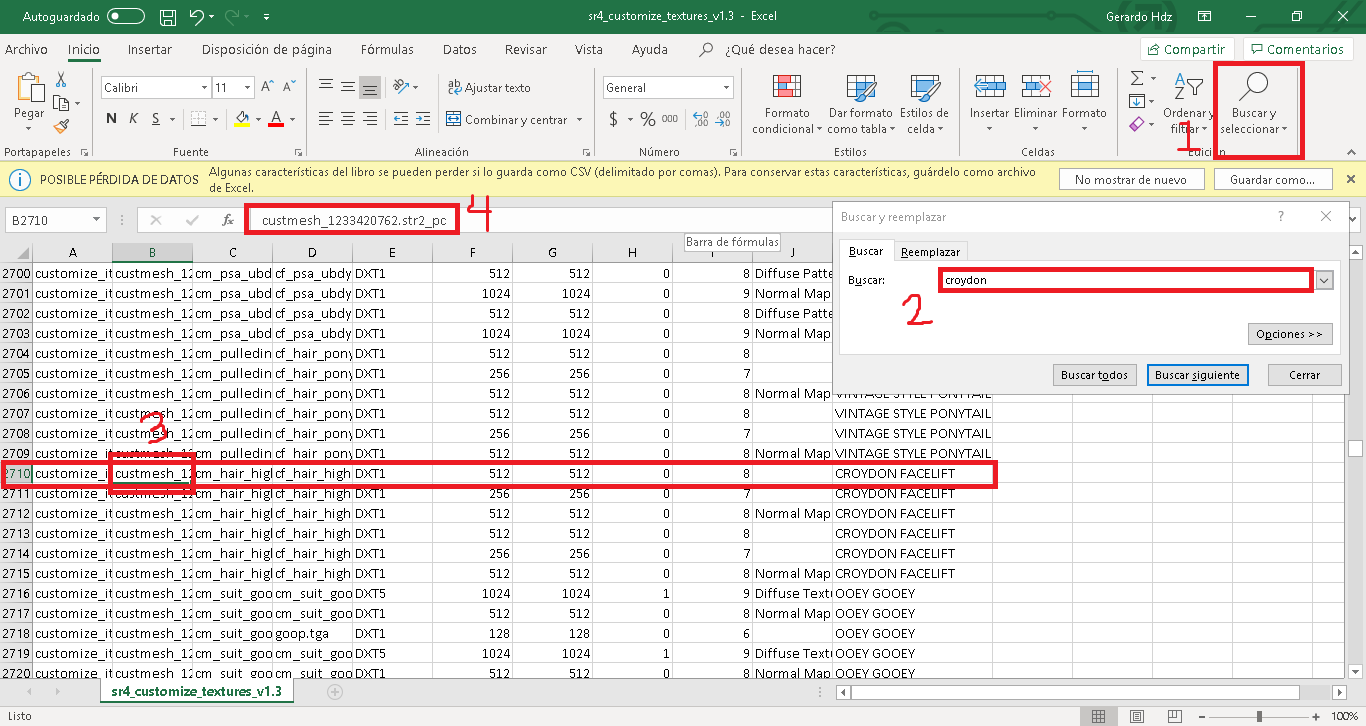
Before getting our hands on the str2_pc file, we must extract the customize_items_vpp_pc using ThomasJepp.SaintsRow.ExtractPackfileGUI, it will create a new folder containing all the the items in game. Once there, use the windows search option within the folder and copy the str2_pc name we got from the excel, it will highlight the files needed and we extract them with the same tool.

STEP2: CONVERTING THE RIG
(Mesh importer plug in should be already installed at this step)
Once we extracted the str2_pc, we now have access to the mesh and skeleton file, however we must convert it to a format compatible with maya.
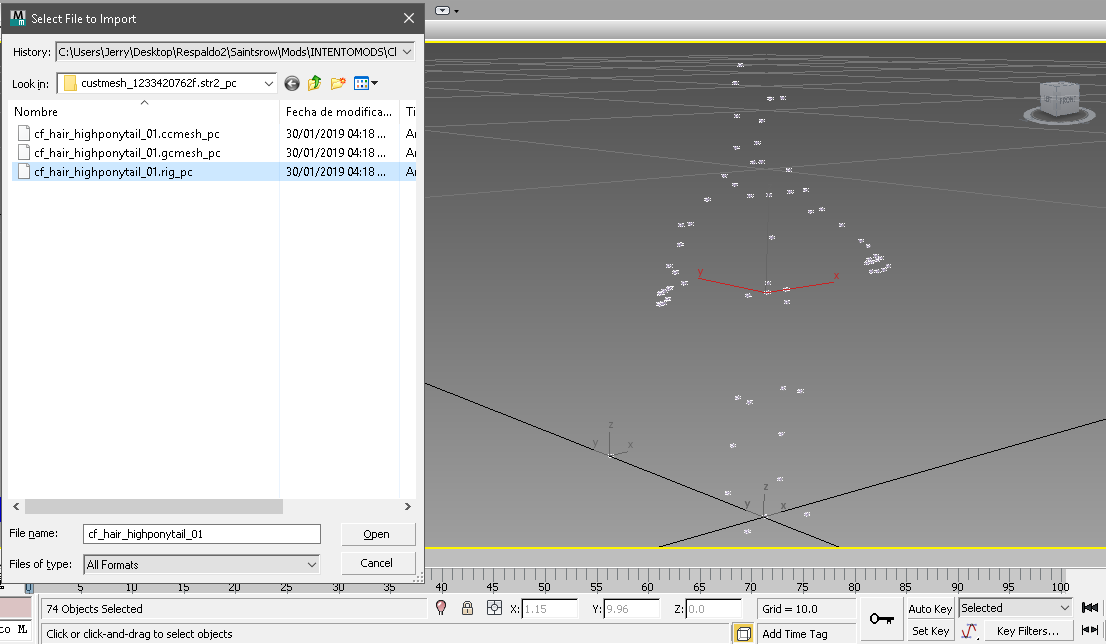
STEP3: WORKING WITH MAYA
Now that the skeleton is in a compatible format, we open the SDK template and import the fbx.
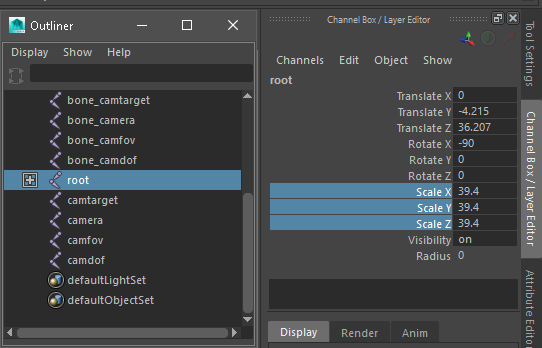
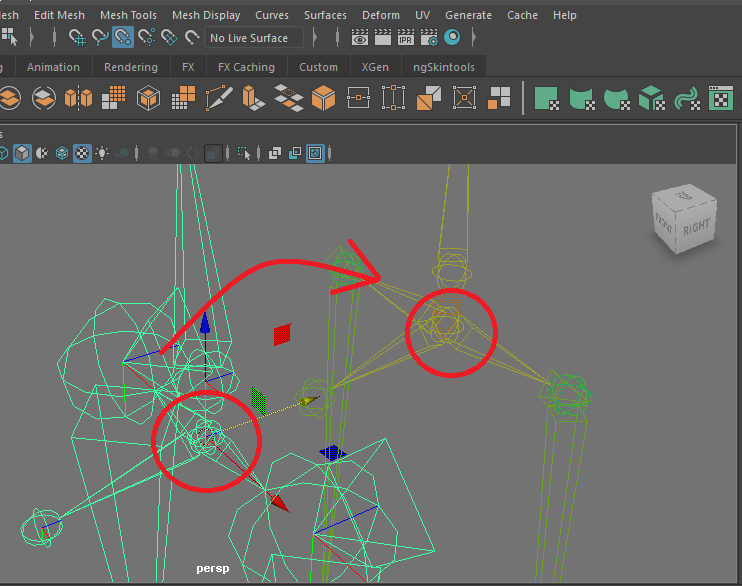
CREATING NEW BONES
Now with the two rigs in the same place, we need to create the extra bones and relink them to the SDK skeleton. This next step is IMPORTANT and try to do it carefully, if you mess with the bones from the template it may break the file or you will have errors while exporting, in both scenarios, the SDK converter may fail in the process once imported!

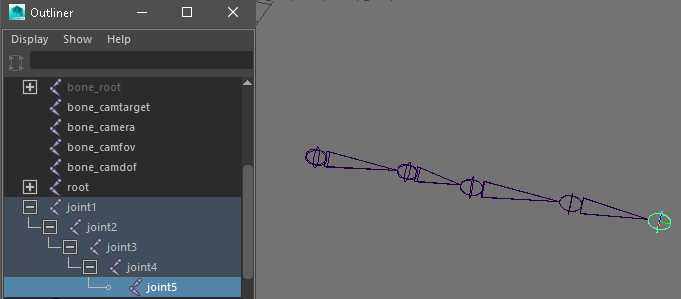
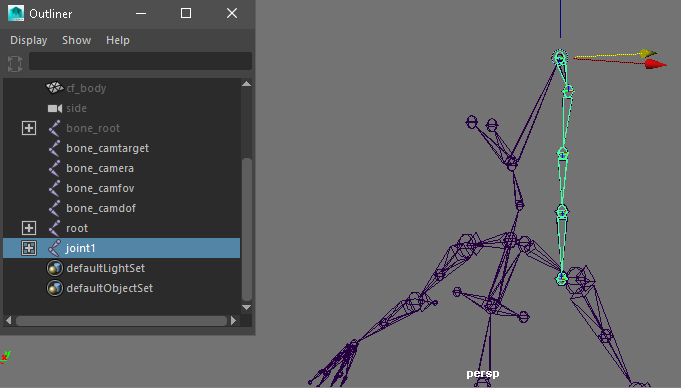
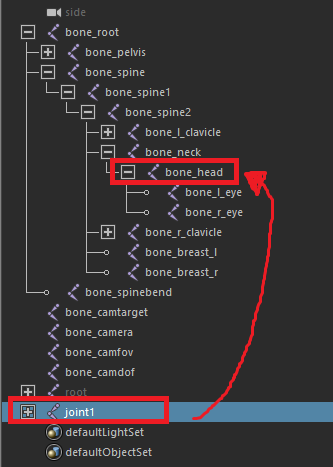
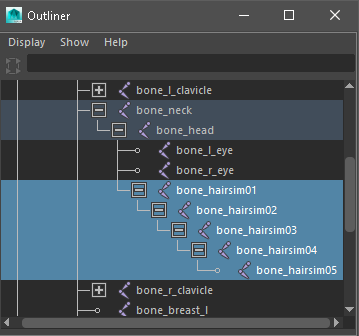
Once Re-linked, rename the joints identical to the one showed in the imported skeleton. In my case, the bones each bone is called “hairsim” followed by a number depending on its order. I retype its name in the outliner but adding “bone_” to match the one from the SDK template
ADDING EXTRA ATTRIBUTES
In order for the skeleton to work properly, we need to add extra info to the newly created bones.
Select the joints > Modify > Add Atrribute. This will add two extra options to the Atributes editor tab(extra attributes):
Name:
Long name: p_bone_name
Nice name: P Bone Name
Attribute: hidden
Data type : string
Order
Long name: p_bone_order
Nice name: P Bone Order
Attribute: keyable
Data type: integer
This will add two extra options to the Atributes editor tab, scroll down to extra atributes to fill the blank with the needed info:
It will make sense that the extra bones follow that numeric order, usually thats the case, but to make sure lets open the .rig_pc file with our hex editor. Scroll down to the end, you ll see the names of each bone from the chara skeleton, they dont have any numbers, but youll notice that way they are listed matches the number ID order from the maya file.
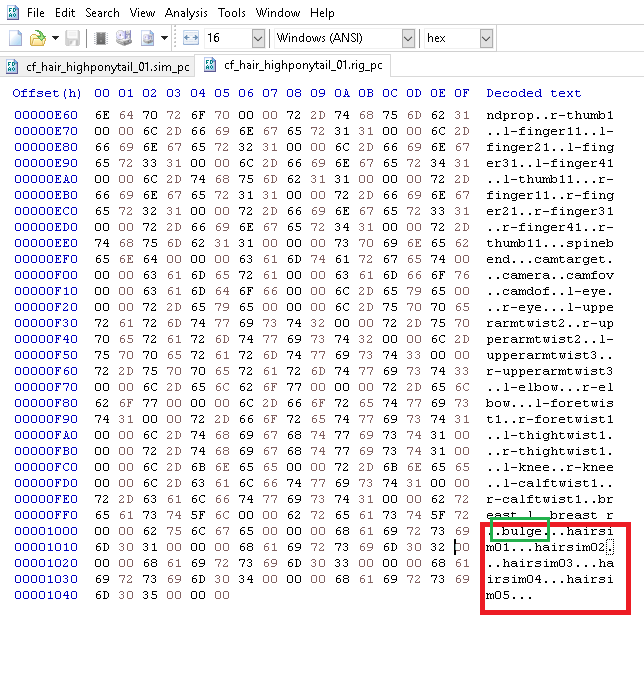
In my case, the extra joints are listed after the bulge bone, so the following order will be 71, 72, 73… etc.
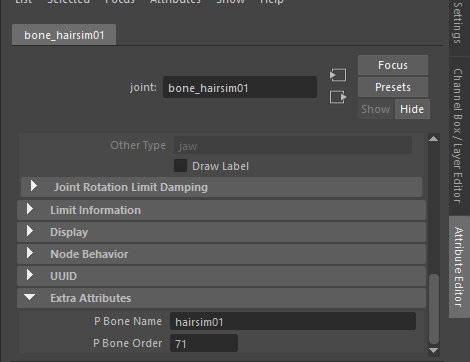
After doing this, the skeleton is ready to be used. Just make sure to type the info for each new joint
IMPORTANT:
STEP4: RIGGING AND SKINNING
This step covers the last part of the maya work process, so you should have your mod ready with materials applied and morphs( if any). Select both your mesh and bone_root and skin them together (skin>bind skin)
Now we copy the sking weights from the chara body to our mods mesh using copy skin weight, however Ive been using a different configuration for this tool:
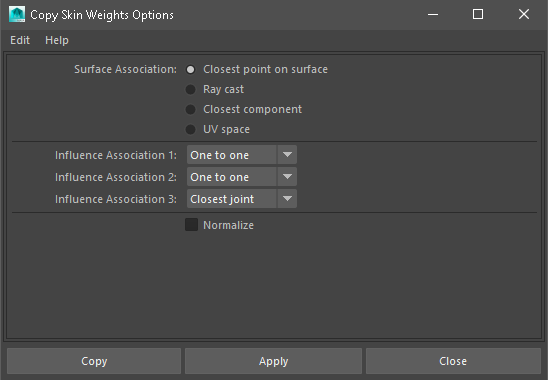
This is not really necessary but it has worked better for me, this config wont copy any weight from the extra bones, leaving a “white canvas" in the mesh were we can have a clear view for the next tool; it also "mirrors" the body weights and requiere less fixes for the base bones.
SKINING THE EXTRA BONES
TIP: If the mesh has lots of vertex, try rotating the joints a little bit, this way you may notice missing vertex.
FIXING WEIGHTS WITH NGSKINTOOLS
Mayas Paint tool is a bit “destructive” when doing this kind of job. In my case I end up with something like this:
We will be using the ngskintools plugin to fix this. As i said before, try to install it before working on your mod, or you ll need to restart maya if you add it at this step.
Once installed, a new tool tab will appear on the menu, however it will be empty if you click on it. The plugin needs to be activated manually, so you ll need to repeat these step on each maya file. Run this Python code in the command bar:
Maya might freeze for a few seconds, but it will be ready to be used once its done.
The pony tail has its weights broken, however the rest of the hair is properly skinned, if try to run the tool without specifying an area, I might break the whole mesh weights. Ill change my selection mode to vertex and pick only the ones that are skinned to the extra bones.
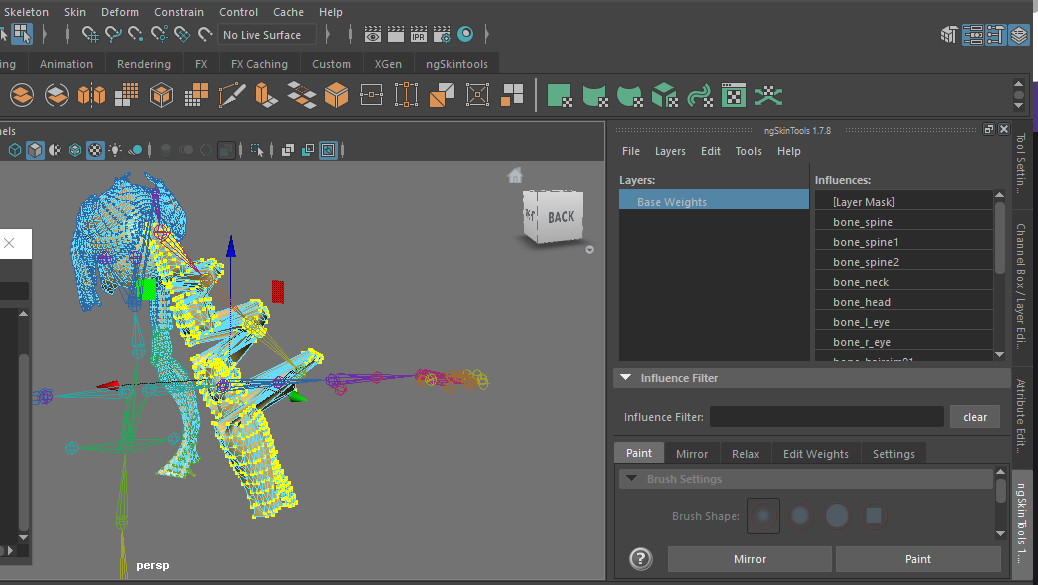
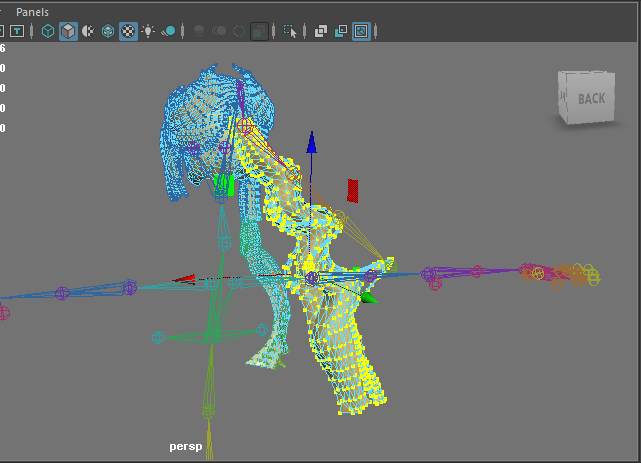
I have smoother results now, however it has a weird movement on some parts; this is because those vertex have skinning influences from adjacent bones. To fix them swap to the Paint tab, and click on Paint and use this settings:
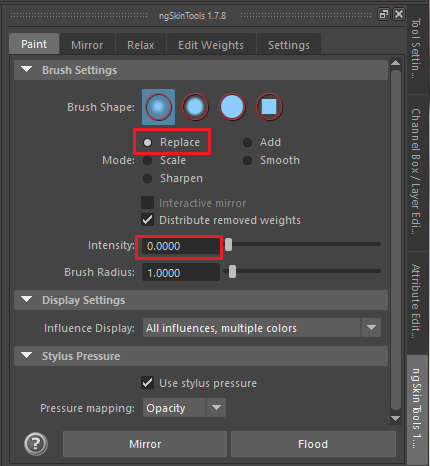
(Intensity 0= No bone influence, 1=Full bone influence)
In my case, Ill pick the spine bones and the neck joint on the list and remove the weights; same as before, one by one. Once done, the pony tail will move correctly without breaking the smooth weights. This means the mesh is now ready and we can export it as FBX
STEP5: THE CONVERTER AND REPLACING FILES
The conversion process will be the same as with a normal mod:

Now we must replace those with the extracted ítem ones from the first step, but theres something we must do first:

Now we add the mod to the game using the packager and see if it works:
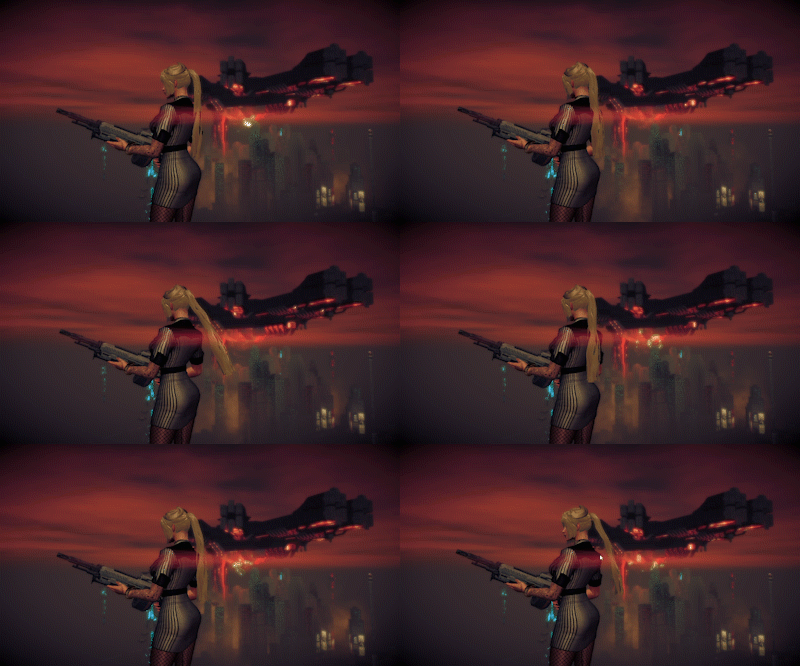
IT MOVES! So Congratulations you have successfully added physics to your mods
POSSIBLE FAQ:
Special thanks to Flow754 and Henry08 for providing me the info regarding this topic.
Just for the record, IMO this is an "advanced" level, considering it requires previous modding exp, some knowledge in maya´s UI and how game models and skeletons work.
Tools Needed:
-Minimauls tools
-Any Hex Editor
- Old 3ds MAX (2010-2013)
-Mesh importer for 3ds max
-Quantum´s List of customize textures
-MS Excel (Or similar)
-SDK Item Template
-ngSkinTools plugin for maya (This one is optional, but i really recommend it if you want nice and smooth results.
Info:
Theres no way to obtain older 3dsMax versions from Autodesk anymore, so this might be a problem since the mesh importer plugin only works up to 3dM 2014.
If you need a skeleton let me know and ill extract it for you.
If you need a skeleton let me know and ill extract it for you.
REGARDING THE GAME PHYSICS
Before starting with the tutorial, theres something that must be explained first, every item in game is a mix of different files, but the important for now are the highlited ones: rig_pc and sim_pc.

-RIG_PC: The "skeleton", it contains the main bones from the chara body, and some extra depending on the item, they control which part of the mesh moves.
-SIM_PC: This one is the most important, it controls the physics, how the extra bones move and react to the game wind, free fall, etc.
Why do we need these files if we have the converter then? Well the thing is, we dont have a tool to create a sim_pc file, so thats why we need to use the ones that are already in the game assets.
CLONED ITEM TO REPLACE
Compared to a normal workshop mod, this task requires an specific clone. One must copy an item that has physics in game, this way its .asm_pc will be listing the .sim_pc and .rig_pc files, if you dont, the physics wont work no matter what you do.
Made tests with different items and some gave me bugs or crashes, thats why I suggest cloning TOWEL CROWN, Ive been using it without problems so far.
NOTE: For some reason the cloning tool crashes when you try to clone a suit with physics. TOWEL CROWN is a head gear, but dont worry, change the item slot labeled in the xbtl to the one desired for your mod.
STEP1: PLANNING AHEAD
You should have in mind what type of mod you wanna create. For this tutorial I will be making a new headgear to simulate a hair, so I launch my game and search for an item thats similar to what I want to achieve:
After copying the name, open Quantum´s excel file, it contains a list of all the customizable items available , showing its name, and the str2_pc containing it.
- Use the search option, a small window will pop up, type the item´s name in there.
- Excel will now show all the details from it, we select the str2_pc name, copy it.
Before getting our hands on the str2_pc file, we must extract the customize_items_vpp_pc using ThomasJepp.SaintsRow.ExtractPackfileGUI, it will create a new folder containing all the the items in game. Once there, use the windows search option within the folder and copy the str2_pc name we got from the excel, it will highlight the files needed and we extract them with the same tool.
STEP2: CONVERTING THE RIG
(Mesh importer plug in should be already installed at this step)
Once we extracted the str2_pc, we now have access to the mesh and skeleton file, however we must convert it to a format compatible with maya.
- Open 3ds max> import >search for the extracted folder and select the rig file.
- A small window will appear showing a small list, just make sure the first option is checked and click ok
- Several dots will appear on screen, thats the skeleton.
- We dont need 3ds max anymore so just select the rig and export it as FBX. (Use the default export options)
STEP3: WORKING WITH MAYA
Now that the skeleton is in a compatible format, we open the SDK template and import the fbx.
- A tiny rig will appear, scale to 39.4.
- Select the new skeleton in the outliner, and activate snap to point tool from the options above or holding the "v" key while using the move tool, move it so it matches the skeleton from the template.
- The imported bones will now work as our reference, so make sure the scale and the cordinates are the correct ones.
CREATING NEW BONES
Now with the two rigs in the same place, we need to create the extra bones and relink them to the SDK skeleton. This next step is IMPORTANT and try to do it carefully, if you mess with the bones from the template it may break the file or you will have errors while exporting, in both scenarios, the SDK converter may fail in the process once imported!
- Click on the Rigging tab menu and select Create Joins tool (second icon).
- Considering my mod needs a chain with 5 extra bones, I will make 5 consecutive clicks, this will create the chain.
- Place the new bones in the exact same spot as the template using move and snap to point tool. (INSERT key from your keyboard can move each bone individually).
- Re-link the newly created joints to the bone_root skeleton, in my case, they are placed in the head joint. Select the bones and drag them using the mouse middle button.
Once Re-linked, rename the joints identical to the one showed in the imported skeleton. In my case, the bones each bone is called “hairsim” followed by a number depending on its order. I retype its name in the outliner but adding “bone_” to match the one from the SDK template
ADDING EXTRA ATTRIBUTES
In order for the skeleton to work properly, we need to add extra info to the newly created bones.
Select the joints > Modify > Add Atrribute. This will add two extra options to the Atributes editor tab(extra attributes):
Name:
Long name: p_bone_name
Nice name: P Bone Name
Attribute: hidden
Data type : string
Order
Long name: p_bone_order
Nice name: P Bone Order
Attribute: keyable
Data type: integer
This will add two extra options to the Atributes editor tab, scroll down to extra atributes to fill the blank with the needed info:
- Name: Type the bone name from the outliner in here, but make sure to remove the “bone_” in here
- Order: In case you havent noticed, each joint has an specific number ID which tell the bone order in game. The last joint from the SDK is the bulge bone, and has 70 as the number order.
It will make sense that the extra bones follow that numeric order, usually thats the case, but to make sure lets open the .rig_pc file with our hex editor. Scroll down to the end, you ll see the names of each bone from the chara skeleton, they dont have any numbers, but youll notice that way they are listed matches the number ID order from the maya file.
In my case, the extra joints are listed after the bulge bone, so the following order will be 71, 72, 73… etc.
After doing this, the skeleton is ready to be used. Just make sure to type the info for each new joint
IMPORTANT:
- You must be careful with this step and make sure everything is correct, if a mistake is made, the converter will show an error or the ítem may not work once added to the game
- As i said before, most of the extra bones are usually listed after the bulge joint, but THIS IS NOT ALWAYS THE CASE. So make sure to repeat this step every time yo use a new rig just to make sure.
- Some items may have less bones ( bulge/ fingers/ feet/ eyes) if this was the case, just make sure to delete the bones from the SDK template, and re order each joint to match the rig file.
STEP4: RIGGING AND SKINNING
This step covers the last part of the maya work process, so you should have your mod ready with materials applied and morphs( if any). Select both your mesh and bone_root and skin them together (skin>bind skin)
Now we copy the sking weights from the chara body to our mods mesh using copy skin weight, however Ive been using a different configuration for this tool:
This is not really necessary but it has worked better for me, this config wont copy any weight from the extra bones, leaving a “white canvas" in the mesh were we can have a clear view for the next tool; it also "mirrors" the body weights and requiere less fixes for the base bones.
SKINING THE EXTRA BONES
- Select your mod mesh> Skin> Paint skin weights
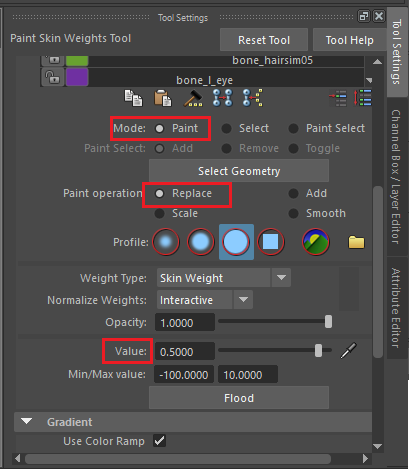
- Once the tool is activated, go to the tool settings tab and make sure this values are correct:
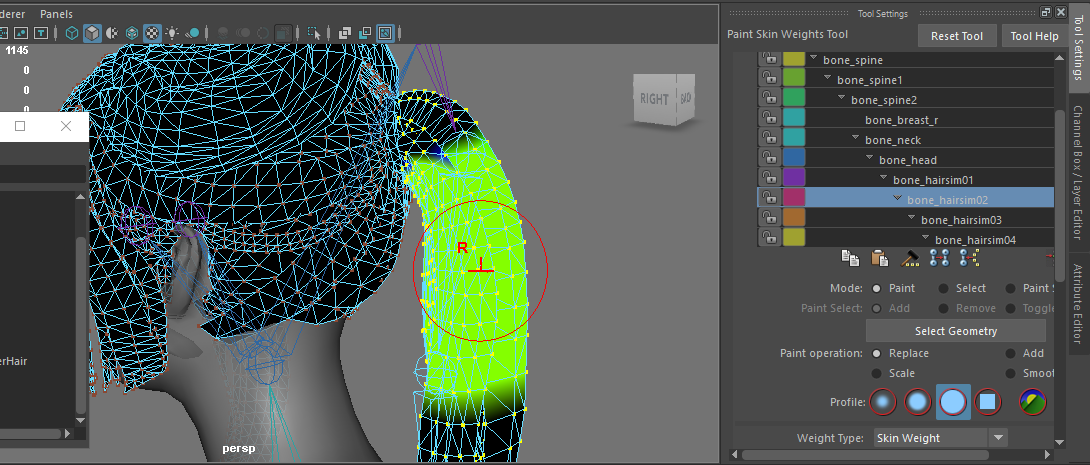
- Theres a list of all the bones in the tool settings. Select your extra joints and start painting the mesh parts that belong to that bone. You will have to repeat this step for each bone.
TIP: If the mesh has lots of vertex, try rotating the joints a little bit, this way you may notice missing vertex.
FIXING WEIGHTS WITH NGSKINTOOLS
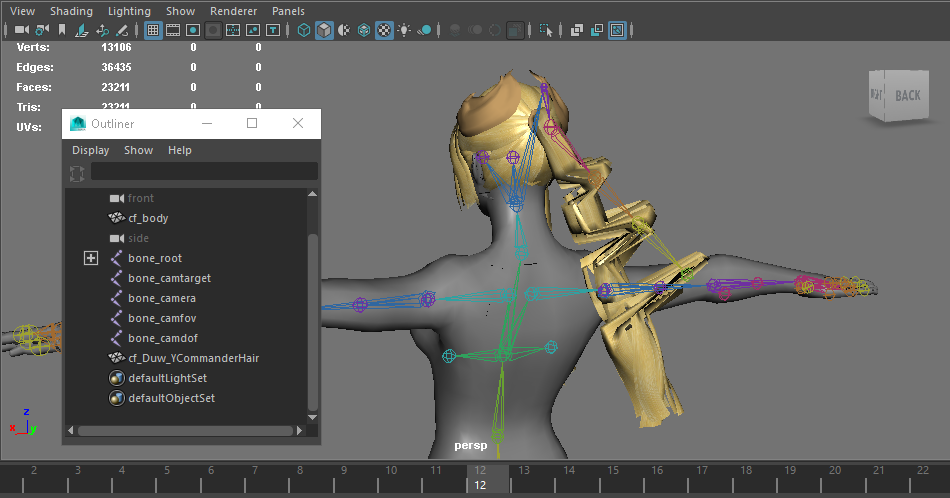
Mayas Paint tool is a bit “destructive” when doing this kind of job. In my case I end up with something like this:
We will be using the ngskintools plugin to fix this. As i said before, try to install it before working on your mod, or you ll need to restart maya if you add it at this step.
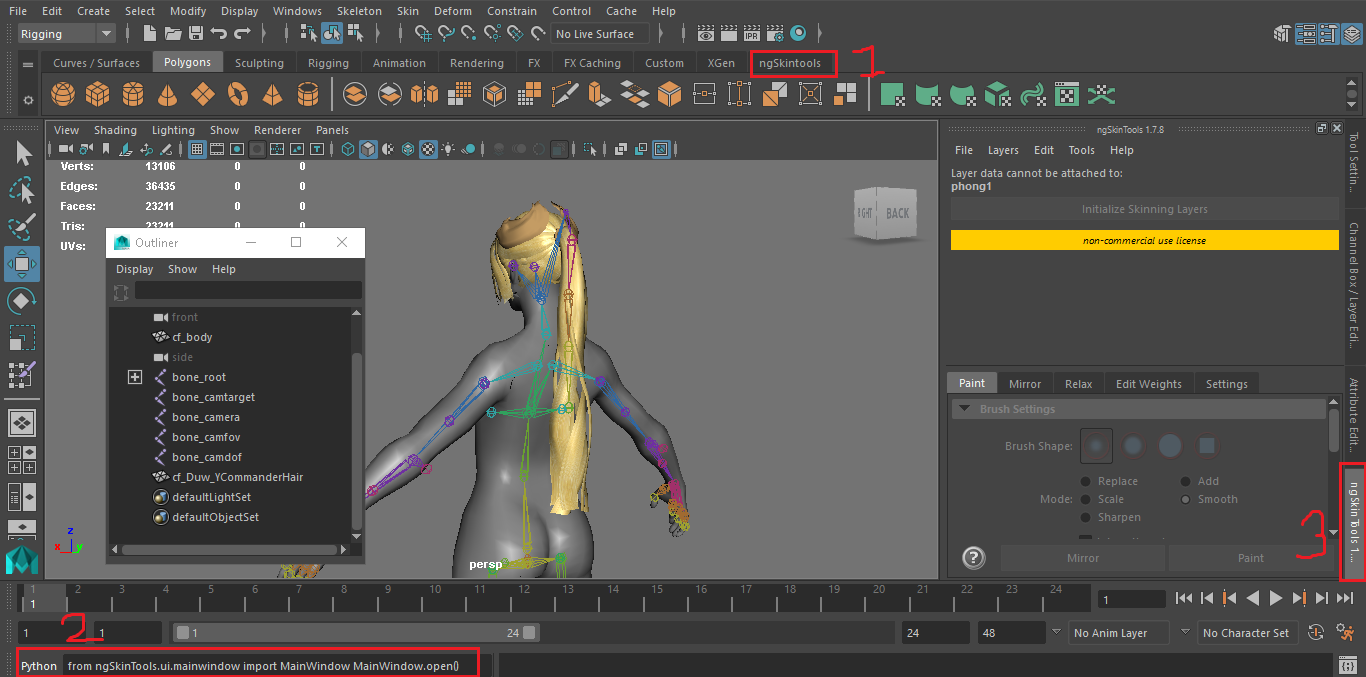
Once installed, a new tool tab will appear on the menu, however it will be empty if you click on it. The plugin needs to be activated manually, so you ll need to repeat these step on each maya file. Run this Python code in the command bar:
Code:
from ngSkinTools.ui.mainwindow import MainWindow MainWindow.open()Maya might freeze for a few seconds, but it will be ready to be used once its done.
The pony tail has its weights broken, however the rest of the hair is properly skinned, if try to run the tool without specifying an area, I might break the whole mesh weights. Ill change my selection mode to vertex and pick only the ones that are skinned to the extra bones.
- Select the vertex and click initialize skinning in the tool tab. A similar menu to mayas Paint tool will appear, showing the bones andbrush settings.
- Go to relax tab, using default settings and click on relax. Weights will fix on their own
I have smoother results now, however it has a weird movement on some parts; this is because those vertex have skinning influences from adjacent bones. To fix them swap to the Paint tab, and click on Paint and use this settings:
(Intensity 0= No bone influence, 1=Full bone influence)
In my case, Ill pick the spine bones and the neck joint on the list and remove the weights; same as before, one by one. Once done, the pony tail will move correctly without breaking the smooth weights. This means the mesh is now ready and we can export it as FBX
STEP5: THE CONVERTER AND REPLACING FILES
The conversion process will be the same as with a normal mod:
- Import the FBX
- Select Shaders
- Select cmesh and morph
- Package the mod.
Now we must replace those with the extracted ítem ones from the first step, but theres something we must do first:
- Open the .sim_pc file with the hex editor
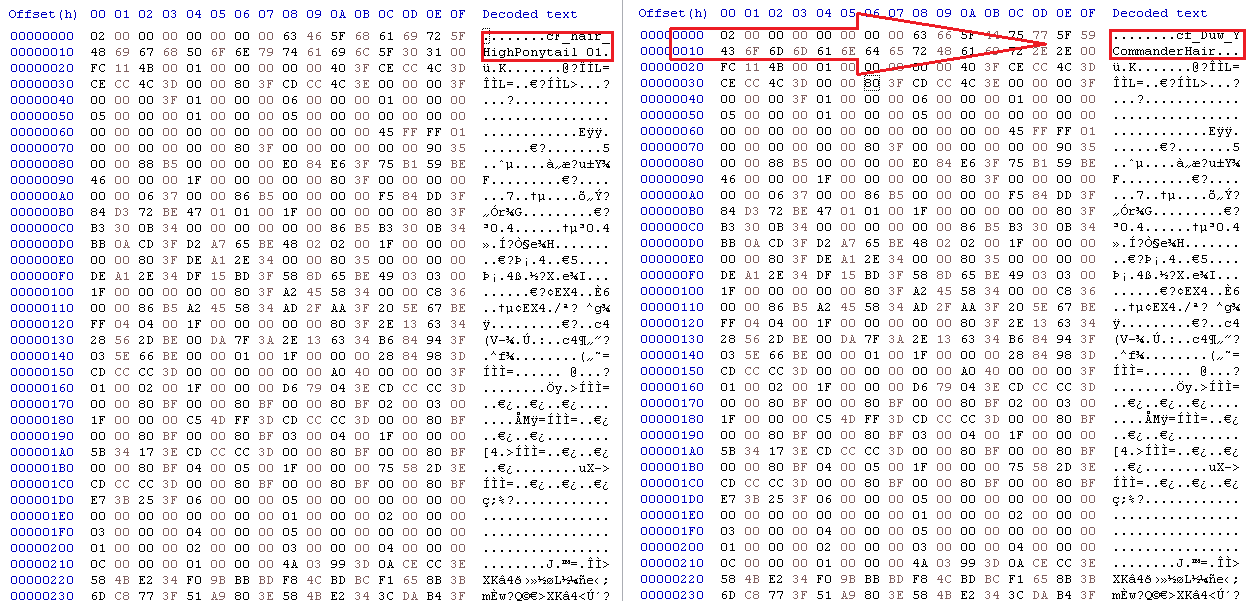
- The name from the original ítem will be on top of the list, we must replace it with the name given to our mod. WARNING: Replace it by highlighting the name and typing over it, DONT DELETE ANYTHING or you will break the .sim_pc file, if the name is to short compared to the original one, just add “.” until the full original name is replaced and save it.
- Rename the .rig_pc and .sim_pc with the same name from your mod. In my case: "cf_hair_highponytail_01" to "cf_Duw_YCommanderHair"
- Copy your edited files and paste them in the extracted mod folfer.
Now we add the mod to the game using the packager and see if it works:
IT MOVES! So Congratulations you have successfully added physics to your mods

POSSIBLE FAQ:
-The converter has the option to create a rig file, this means I can create my custom skeleton?
Yes and no. It is possible to create your own skeleton, but without a sim_pc file the mesh will have super weird movements and the bones will be all over the place. If you are ok with it then go ahead.
-The new bones need to be in the exact same coordinates as the ones from the reference file or can I move them?
As long as they remain linked to the same bone, you can move them , however the more you move them, they wont behave as they are supposed to.
-Can I use the hair bone and relink it to another part of the body?
I did some tests and all led to a crash, so I guess no
-Want a specific bone, but it has more that I dont need. Can I still use the same rig?
Yes, just skin your mesh to the bones you want, it wont happen anything if you dont use the rest.
-Is it possible to merge two skeletons into one?
No. More or less bones than the ones listed in the rig file, will either crash the game or leave you with floating item. If you want multiple chains then is better to split the mesh and use a different rig for each part.
-I need to repeat this whole process for male and female?
Yes, male skeleton is slightly different than the female one, they share the same bones, but its coordinates may differ.
Special thanks to Flow754 and Henry08 for providing me the info regarding this topic.
Attachments
Last edited:
