Heads-up:
A whole thread of written documentation? Ain’t nobody got time for that. This guide’s also available on YouTube as a video tutorial series. Click here or scroll down to the second post in this thread to watch it.
Supported:
Adding completely new clothing items.
Currently unsupported:
Adding new hairstyles.
Creating new physics simulations for clothes or hairstyles.
More than one UV map per 3d model.
Tools needed:
Python 2.6.6
Wx Python
FBX Python SDK 2014 for Python 2.6
Autodesk Maya 2014 (recommended) OR Autodesk 3ds Max
Minimaul's Saints Row IV Tools
Minimaul’s Workshop Upload Tool
Notepad++
Step 0: Installation
SRIV SDK Release B
Minimaul’s Saints Row IV ToolsDownload the latest SDK Release and the latest version of the FBX converter from the release thread.
For the following items, I haven't tested it personally, but if you are on a 32 bit operating system, download the 32 bit versions of each program if applicable.
Python 2.6.6
Download the 64 bit version named Windows X86-64 MSI Installer
Wx Python
Grab the one named "wxPython3.0-win64-py26"
FBX 2014.1 SDK
Install all 3 programs, with Python 2.6 being installed first.
Finally you need to copy some files from the FBX 2014.1 SDK directory to your Python 2.6 directory. This link from Autodesk explains it pretty well.
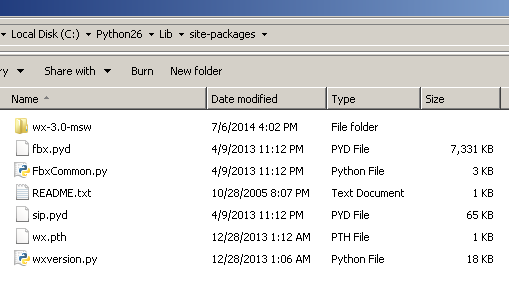
If you properly installed everything your python/lib/site-packages should look at the least like the following:
1) Notice the Wx folder and local files that should have been installed here.
wx-3.0-msw/
wx.pth
wxversion.py
2) The fbx files that you should have copied over to this folder.
fbx.pyd
fbxcommon.py
sip.pyd
Download the archives attached to this thread and extract them to a folder.
Minimaul’s Workshop Upload Tool
Download and extract the archive linked in this thread.
Step 1: Planning Ahead
So you want to create a new customization item for Saints Row IV? Before starting actual work on your mod, you need to have a concrete idea of what you want to accomplish. I can’t stress enough how important concept art is for this step, as it will help you visualize your item and identify problems that might be frustrating to solve later on in the process. You wouldn’t build a house without a floor plan, so with that in mind, take your time and sketch out your modded piece in advance.
*Example concept art. I never said it had to be great.
Additionally, there are a few things to consider with regard to compatibility:
- Which customization slot should your item occupy?
- Which body regions will it cover?
- Will wearing your item cause any clipping issues in combination with other clothes?
- If so, are you simply going to rethink your design or are you going to prevent equipping conflicting items?
- Upper body slot - check
- Covers torso but not the arms - check
Why is it important that the vanilla item covers the same body parts as my item?
Because in SRIV, there’s a system in place which hides polygons of the player character’s body, depending on the customization items worn. If you base your mod on an item that covers larger areas of the body, some parts of the character will appear invisible after you replace the vanilla model with your custom one. On the other hand, if you take a smaller item as a source, the character’s body might end up clipping through your proper clothes.
There’s nothing quite like my concept already in the game. What should I do?
If that’s the case, you should go with an item that’s at the very least assigned to the customization slot you want for your design. Although a little tedious, it is possible to manually tweak which areas of the character will be hidden by your customization item later. For more information, look at this post by Idolninja
Step 2: Creating a New Customization Item by Cloning
The purpose of this step is to create a tangible new customization item the simplest way possible – essentially by extracting and duplicating all game files of the item you chose in step 1. For that, we’ll use “ThomasJepp.SaintsRow.CustomizationItemClone.exe”, one of Minimaul’s command line tools.
First, download the "reference_files.zip" archive provided at the bottom of this post. In there, you will find a bunch of uncompressed localization files named "reference_strings_xx.xml" (replace "xx" with language abbreviations such as "de", "ru", "us" etc.) and a file called "customization_items.xtbl". Xtbl files are very similar to xml files and can be edited with any text editor.
Open the reference strings file associated with the language you’re playing SRIV in. Since I’m playing the English version, I would open "reference_strings_us.xml". Then search the name of the item you chose to base your mod on, by pressing CTRL+F.
Next to your item’s in-game name, there will be a variable name without spaces and in ASCII characters only.
Copy that without the quotation marks and open customization_items.xtbl. Again, open the search window, paste the variable name into the search box and hit enter until you find an occurrence next to a "<DisplayName>" tag.
Almost there. Now if you look slightly further to the left in the same line, you’ll see both a "<Name>" and a "</Name>" tag. The text between those two tags is what you’ll need very soon. (This might be the same as the variable name from reference_strings_xx.xml, but that’s not always the case.)
Minimize Notepad and open the command prompt by typing "cmd" into Windows’ search box (WIN+S).
Navigate to your tools folder by typing the following command.
Code:
cd “C:\yourPathTo\MinimaulsToolsFolder\”You might need to explicitly specify the drive your directory is on. Use the image above for reference.
Finally, run the clone tool by typing the command below. Replace “source” by the text you found between the name tags in customization_items.xtbl and “name” by a made-up name for your new item. The quotation marks are optional, but I recommend using them in case there’s a space in the source name.
Code:
ThomasJepp.SaintsRow.CustomizationItemClone “source” “name”Do’s and Don’ts for your custom name:
- The name has to be unique. Check if there’s no other item named the same way in customization_items.xtbl.
- Include your Steam or Saintsrowmods username, so that two modders never end up with identical names.
- Don’t use spaces or non-ASCII characters (ä, ö, ü, ú, ê, è, étc.).
- Even though many names in customization_items.xtbl do it, don’t start your name with “cm_” or “cf_”. The clone tool adds that automatically.
*mod folder in Minimaul's tools directory
*contents of mod folder
At this point, you can skip steps 3 and 4 and upload the files in the newly obtained folder to Steam Workshop. Subscribing to your mod will then allow you to see a clone of your chosen item in one of the games’ clothing stores/plastic surgeons.
Xtbl, str2_pc, asm_pc? I’ve never seen file extensions like these. What’s up with them?
Although this guide is written to be generally intelligible regardless of technical understanding, I recommend you have a look at this post in order to get familiar with Saints Row IV’s proprietary file formats. This will give you a good idea as to what the files you just generated contain.
Although this guide is written to be generally intelligible regardless of technical understanding, I recommend you have a look at this post in order to get familiar with Saints Row IV’s proprietary file formats. This will give you a good idea as to what the files you just generated contain.
Step 3: Making Custom 3d Models with Templates
In this section, you’ll create 3d models to replace the ones of your cloned item. To make things easier for you, there are ready-made Maya scenes and FBX files included in the SDK’s archive, which can be used as modelling templates and skinning aids. For now, let’s focus on the two Maya scenes: "male_character_template.mb" and "female_character_template.mb".
Unlike in Saints Row 2, there are at least two models for each clothing item in SRTT and SRIV – a male and a female version. Either one of them comes with a variety of morph targets that allow for character customization sliders in-game. Here’s a little hierarchy for you to visualize the components of a clothing item:
- Puffer Vest (cm_ubdy_puffyvest01) <----- clothing item
- cm_ubdy_puffyvest01.cmeshx <----- mesh for male characters
- body_fat_minus <----- thin male character shape
- body_fat_plus <----- thick male character shape
- body_muscle <----- muscular male character shape
- cf_ubdy_puffyvest01.cmeshx <----- mesh for female characters (hence “cf_”)
- body_fat_minus <----- thin female character shape
- body_fat_plus <----- thick female character shape
- body_muscle <----- muscular female character shape
- cm_ubdy_puffyvest01.cmeshx <----- mesh for male characters
NOTE: The Maya and FBX files were made in a Z-up coordinate system. Because of that, the models might appear to lie flat on the grid rather than standing upright when viewed in Maya with default settings. If you run into this problem, click [Window > Settings/Preferences > Preferences > Settings] and specify Z as the up-axis. Don’t simply rotate the objects. After making changes to the coordinate system, you might have problems navigating in the viewport - restart Maya to fix this issue.
As you can see, the scenes both include a version of the player character model skinned to slightly varying rigs. If, for some reason, you want to modify the rig, keep in mind that the bones need to have hidden extra attributes, which are used by the FBX converter.
Additionally, the bodies each come with a set of morph targets you can view under the “Morpher” tab in the attribute editor while they are selected.
At first, this list might seem overwhelming, so let me break it down for you:
Facial animation morphs: These are the ones above the body customization morphs. They’re used to make characters talk or dynamically show facial expressions, so you will only have to create these morph targets for clothing items in very specific cases (e.g. if you’re making a superhero mask that’s stretched when characters move their mouths, think Spiderman or Deadpool)
Body customization morphs: These are a good point of reference in the morph list, since their names all start with “body_” and there are only very few of them. In fact there are only five body customization morphs, two of which are redundant and never used in-game (“body_gender_male” & “body_gender_female”). Therefore, if your item covers areas below the character’s chin, you only ever have to create three body customization morphs for it: “body_fat_minus”, “body_fat_plus” and “body_muscle”.
Facial customization morphs: All remaining morph targets below the body customization morphs are used for facial customization. Their names typically end with “_plus”, “_minus” or “_pm”, which stands for plus/minus. You only need to create these morph targets if your item covers parts of the head or face.
3d Item Creation Workflow in Maya
Alright, now that you know what the template files comprise, this is how you make proper 3d models for customization items:
1. Model your customization item so that it lines up with the player character’s body. If you don’t know how 3d modelling works, there are plenty of tutorials online. For more advanced artists, make sure your model has similar topology and polygon density to the template body if possible.
IMPORTANT: Name your model the same way you named your customization item in step 2. If you are currently making the female mesh, add “cf_” to the start, otherwise add “cm_” to the start. I wrote the clone command like this:
Code:
ThomasJepp.SaintsRow.CustomizationItemClone “cm_ubdy_puffyvest01” “flow_modExample”In the image below, I was working on the male mesh, hence I added “cm_”. As you can see, I ended up with the name “cm_flow_modExample”.
2. Create a UV map and textures for your model. Saints Row IV generally supports the following texture types:
- Diffuse maps
- RGB pattern maps
These are sometimes used instead of diffuse maps to allow for color customization. Red [0xFF0000], green [0x00FF00] and blue [0x0000FF] pixels will be substituted by different customizable colors. RGB pattern maps can also include baked Ambient Occlusion.
- BCM pattern maps
These are used in combination with diffuse maps to allow for color customization. Blue [0x0000FF], cyan [0x00FFFF] and magenta [0xFF00FF] pixels will be substituted by customizable colors and multiplied by the values of the respective pixels in the accompanying diffuse map.
- Normal maps
Just regular normal maps. Sometimes work better when inverted.
- Specular color maps
- Glow maps
- Sphere maps
Spherical environment maps used for custom reflections. Similar to matcaps in ZBrush.
…and here are the possible combinations:
3. Save your textures together in one folder as Targa files (*.tga).
IMPORTANT: Give them the same base name and add these appendages depending on the texture type:
- "_d" for diffuse maps
- "_dp" for RGB pattern maps
- "_p" for BCM pattern maps
- "_n" for normal maps
- "_s" for specular color maps
- "_gl" for glow maps
- "_sb" for sphere maps
4. Identify the character’s morph sliders that should affect your clothing item. For any item that only covers body parts below the chin, “body_fat_minus”, “body_fat_plus” and “body_muscle” should be all.
Then, model variations of your item for each of those morphs and name them like the respective sliders in “cm_body”/ “cf_body”.
5. For the next steps, it’s important that your transformations are set correctly. Make sure the pivots of all your item’s instances in your scene are set to (0, 0, 0), the origin of the coordinate system. You can edit a pivot’s location by pressing INSERT and dragging it around with the middle mouse button. Holding X while dragging it will make it snap to points of the grid.
Then freeze the transformations of all the models you made. Right click in the channel box editor with each of them selected and hit [Freeze > All.]
IMPORTANT: After freezing your transformations, hit [Edit > Delete All by Type > Non-Deformer History]
6. Now you can assign the morph targets you made to your item. Switch to the Animation toolbar.
Select all instances of your item with the original mesh being the last one added to the selection and hit [Create Deformers > Blend Shape] with these settings:
At this point you can hide your morph targets by setting their visibility values to “off”. Don’t delete them! There should be a new tab in your base model’s Attribute Editor called “blendshape1” or something along these lines. In there you will find a slider for each of your morph targets.
7. It’s time to skin your model to the provided character’s rig. Select “bone_root”, then your model and click [Skin > Bind Skin > Smooth Bind] with these tool settings:
Although your model is technically skinned to the rig now, the vertex weights are horrible. It’s important that the rig influences your customization item in exactly the same way as the character’s body. An easy way to accomplish that is selecting the body provided by the template, then your item and clicking [Skin > Edit Smooth Skin > Copy Skin Weights]. These settings worked very well for me so far:
Check out your model’s skin weights using the “Paint Skin Weights” tool. Depending on the complexity of your item, you might have perfect vertex weights now. If there are still influences you aren’t happy with, adjust them manually. I also recommend using the “Weight Hammer” tool to fix smaller areas with bad vertex weights.
8. Let’s add materials! Open Hypershade by clicking [Window > Rendering Editors > Hypershade]. Add a new Phong material by clicking “Phong” in the “Create” tab.
Make sure you have your custom model selected in the viewport. Assign the new material to your item by holding the right mouse button while hovering over the material’s icon and hitting “Assign Material to Selection”.
Now plug in all the textures you made in the corresponding slots of the material. Here’s a chart for reference:
*RGB pattern Maps and BCM pattern maps use the same slot. The "FBX Slot" column is only relevant if you aren't using Maya.
For example, say you want to add a diffuse map to your model. For that you have to select your material node in Hypershade, go to the Attribute Editor and click the checkered icon next to “Color”.
Click “File” in the “Create Render Node” window.
And browse for your diffuse map by clicking the folder icon in the node’s attribute editor.
If you hold the right mouse button while hovering over the material’s icon and hit “Graph Network”, Maya will automatically order and display all texture nodes assigned to your material in Hypershade’s work area.
NOTE: It’s possible to assign different materials to different polygons of your 3d model. For each material you can use different texture combinations (as laid out in the shader chart further above).
9. Almost done. Now you have to delete “cm_body”/”cf_body”, otherwise your FBX will be way too big. You might not think that’s a problem, but trust me, it is once you are importing it with the FBX converter – I tested it and it took the tool 90 minutes to parse the whole file. Don’t make the same mistake.
10. Finally export your work so that it can be converted to SRIV’s proprietary format. Click [File > Export All…]. Select “FBX export” from the dropdown menu below. Make sure your export settings look like this picture.
*Click to enlarge. If it's still too small, click on the link above.
You might get a message saying Maya couldn't export certain materials afterwards, which you can safely ignore.
NOTE: In the export settings, you should specify Y as the up-axis, even though you actually set Z as the up-axis in the viewport settings before. That is because Y is the default up-axis and selecting it does not change the rotations of your models. If you select Z here as well as in the viewport settings, think of it as a double negative: Just like negative + negative = positive, Z-up + Z-up = mess-up.
Move the FBX to the same directory as the textures assigned to it.
[11. Repeat the whole Maya workflow for the other gender’s version of your item.]
Step 4: Using the Converter
By doing this step you will patch your customization item with the 3d models you created and exported as FBX files. Here I demonstrate replacing the male model of my clothing item.
First, run the converter by opening “SaintsRow_FBX_Converter.py” with “pythonw.exe”. Immediately, the window below will pop up.
Before importing your FBX, check the settings on the menu bar and make sure they look like this:
Now hit the “Import” button and choose an FBX file. Once the tool is done parsing, select the mesh named like your customization item in the dropdown menu.
NOTE: If you did everything exactly like me in this guide, there will only be one mesh in your FBX.
For every material assigned to said mesh, choose one of SRIV’s shaders. Again, here’s a table showing you which texture combinations require which shader.
NOTE: You are free to exclude any textures of a shader. For example, it’s fine not to have a sphere map for a material associated with the “ir_sr3pccloth” shader.
After configuring your materials, hit the buttons labelled “Cmeshx” and “Morphx”, so that they are highlighted. Then, click “Convert”. This will automatically produce all files for your asset and store them in a folder called “output” in the same directory as your FBX.
Last but not least, patch your mod’s files with the new data in the “output” folder. For that you have to first click the “Folder” button and specify the directory where your mod’s *.str2_pc are stored. Then press the big “Package” button.
IMPORTANT: You have to patch your mod’s morph files manually. In order to do so, copy the files with the “cmorph_pc” extension from the “output” folder to the folder your mod’s *.str2_pcs are in and overwrite the existing files there. I recommend doing this after the automatic packaging process is completed.
Great, you did it! If there are any other models you need to replace (for example the female version), simply repeat this procedure with the respective FBX files. Proceed to the next step if you want to view your models in-game.
In Maya, Z was the up-axis, then I had to export as Y-up and now I should check the “Force 3dsMax ZUp, In” setting? Are you kidding me?
I admit that’s a little confusing. In short, the Y-up setting in the FBX export options does not do anything, whereas choosing Z-up would have rotated your model by 90 degrees on the X-axis. Therefore, your model’s orientation did not change and is still aligned with the Z-axis, which is what you have to specify here.
Why do I have to click “Cmeshx” and “Morphx”? What do the other buttons do?
The buttons in the “CONVERT” section specify which files will be generated by the converter.
- Rigx files contain bone data and will be further converted to *.rig_pc files. They are mostly used for weapons and customization items that need additional bones (e.g. for capes).
- Cmeshx files include the mesh’s geometry, vertex weights and materials. They will be further parsed and converted to mesh and peg files.
- Matlibx files hold additional shader information and will be further converted to *.matlib_pc files. There’s no need to generate them for customization items.
- Morphx files contain the morph targets’ geometry and are therefore absolutely essential for customization items.
Step 5: Uploading to Steam Workshop
If you’ve come to a point in your mod creation process where you want to preview your work in-game or even make it available to the public, run Minimaul’s Workshop Upload Tool.
Drag and drop all your mod files onto this table.
Clicking [File > Save > To Steam Workshop…] will open the upload form below. It’s pretty much self-explanatory, but be careful when setting the visibility. If your mod is still work in progress, make sure it’s set to “Private” or “Friends Only”, so you don’t flood the Workshop with broken content. In case you want to add a thumbnail picture, sometimes non-square icons will be distorted in the Workshop item browser. Hence it’s recommendable to choose an image with equal dimensions. Once you’re done filling out the form, click “Upload”.
As soon as the tool has finished uploading, it will open the Workshop page of your mod. Click “Subscribe” if you’re currently not subscribed to it. Click “Unsubscribe” and subscribe again to force Steam to download your mod if you were subscribed already. Otherwise you might not see any changes in-game.
My internet connection sucks, so I don’t want to upload all my files again every time I make some little changes. Is there a way to preview my mod offline?
I feel you and yes, there’s a way to do that. In the Workshop Upload Tool, instead of clicking [File > Save > To Steam Workshop…], click [File > Save > To file…] and save the vpp_pc file in a folder called “mods” inside your Saints Row IV root folder (…\SteamApps\common\Saints Row IV\mods). Simply create a “mods” folder if there isn’t one already. It’s up to you how you want to call your package file, but make sure it doesn’t have the same name as one of the vpp_pcs in SRIV’s cache folder (…\SteamApps\common\Saints Row IV\packfiles\pc\cache).
I lost my local mod files. Is it possible to retrieve them from Steam Workshop?
Yes, just click [File > Open > From Steam Workshop…], select a mod and click “Open”. This will load the mod’s files into the table. You can then save the files anywhere on your computer by right clicking them and hitting “Extract”.
Golly gee, that sure is a fantastic tool!
Agreed. Be sure to check out this thread if you want to learn more about it.
Step 6: To Infinity and Beyond
Congratulations! At this point you have probably made an awesome mod for the community to enjoy. If something didn't work as expected, leave a reply here or create a thread in the Get Help/Troubleshooting sub-forum. Don't hesitate to notify me with @flow754 if you go for the latter.
Be sure to also check out these tutorials if you want to further modify your item or if you want to learn more about Saints Row modding in general:
Strings tutorial
Unhappy with your item’s name in Planet Zin? Read this tutorial or watch me change it at the end of my first video tutorial.
XTBL tutorial
There's a lot more to Saints Row than just customization items. Check out this guide on how to edit table files.
LUA tutorial
Learn how to initialize custom LUA scripts and take your mods to the next level.
Attachments
Last edited:
